Setting Up G Wireless Network on Mac: A Step-by-Step Guide
Connecting to a Wi-Fi network on your Mac is a straightforward process that requires a few simple steps. However, if you're new to setting up Wi-Fi networks on your Mac, it can be a bit overwhelming. In this article, we'll guide you through the process of setting up a wireless network on your Mac, troubleshoot common issues, and manage your wireless connections efficiently.
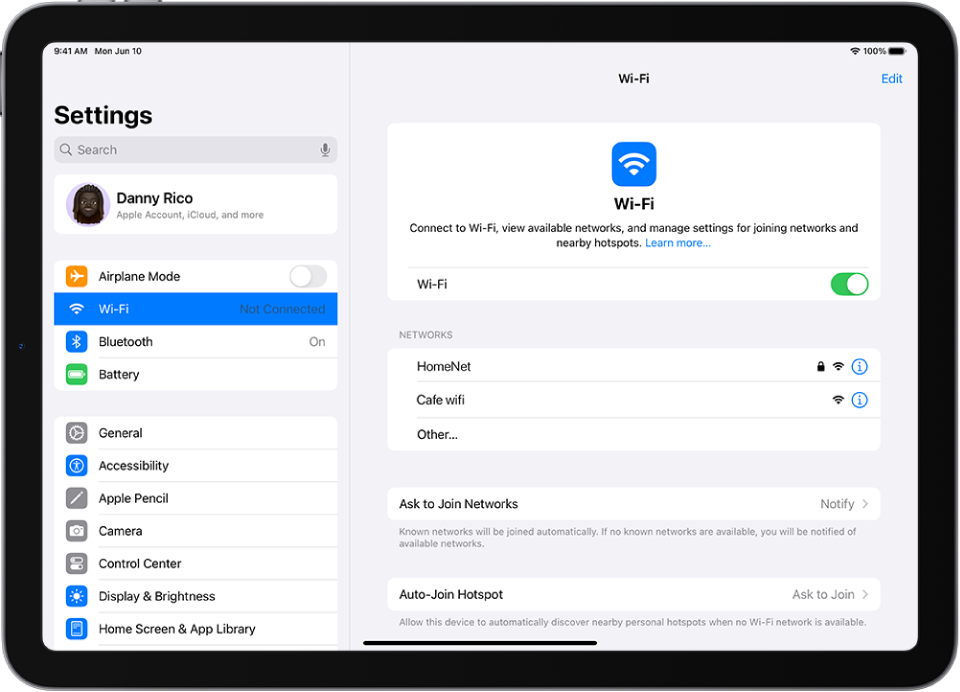
Step 1: Ensure Your Mac's Wi-Fi is Turned On
The first step in setting up a wireless network on your Mac is to ensure that your Mac's Wi-Fi is turned on. You can do this by going to System Preferences > Network and selecting Wi-Fi. Make sure that Wi-Fi is turned on and select the network you want to connect to.
Step 2: Connect to the Wi-Fi Network
Once you've selected the Wi-Fi network you want to connect to, your Mac will automatically connect to it. If prompted, enter the network password to complete the connection process.
Moving forward, it's essential to keep these visual contexts in mind when discussing Setting Up G Wireless Network On Mac.
Step 3: Configure Your Wi-Fi Settings
Step 4: Troubleshoot Common Issues
Even with the best Wi-Fi settings, issues can still arise. If you're experiencing connection issues or dropped connections, there are a few steps you can take to troubleshoot the problem. For example, you can restart your Mac and Wi-Fi router, move closer to the router to improve the signal strength, or check for Wi-Fi interference from other devices or networks.
Step 5: Manage Your Wireless Connections
Managing your wireless connections is essential to ensuring a smooth and uninterrupted internet experience. You can do this by going to System Preferences > Network and selecting the Wi-Fi network you're connected to. From here, you can view the available networks, manage the settings to join networks and nearby hotspots, and configure your Wi-Fi settings to suit your needs.

- Make sure you're using the latest version of macOS to ensure compatibility with the latest Wi-Fi standards.
- Restart your Mac and Wi-Fi router regularly to improve performance and prevent dropped connections.
- Move closer to the Wi-Fi router to improve signal strength and reduce interference from other devices or networks.
- Use a Wi-Fi analyzer to identify potential issues with your Wi-Fi network.
- Reset your network settings in System Preferences > Network > Advanced > TCP/IP for advanced users.
Conclusion
Setting up a wireless network on your Mac is a simple process that requires a few basic steps. By following these steps, you can connect to a Wi-Fi network, troubleshoot common issues, and manage your wireless connections efficiently. Remember to stay up-to-date with the latest macOS updates and use the latest Wi-Fi standards to ensure a smooth and uninterrupted internet experience.
Additional Resources
- Unifi OS is pre-installed on UniFi Consoles, streamlining the setup process so you can get your network up and running quickly.
- Boingo designs and deploys wireless networks that power everything from small businesses to some of the world's most complex, high-demand environments.
- Learn how to set up your development environment and Android device for testing and debugging over an Android Debug Bridge (ADB) connection.


 (VIDEO)")
 - Wikipedia")
 | Android Studio | Android Developers")


 | HP® Support")


