Writing a Check with a Check Number: The Ultimate Guide
Despite the rise of digital payment methods, writing a check is still a crucial skill that every individual should possess. Whether you're paying bills, buying goods, or making loans, knowing how to write a check correctly is essential. In this comprehensive guide, we'll walk you through the steps to write a check with a check number, ensuring you make prompt and secure payments every time.
What is a Check Number?
The check number, also known as the check sequence number, is a unique numerical identifier assigned to each check by the bank or financial institution. It's usually located in the top right corner of the check, and its purpose is to help keep track of the number of checks used and prevent fraudulent activities.
Parts of a Check
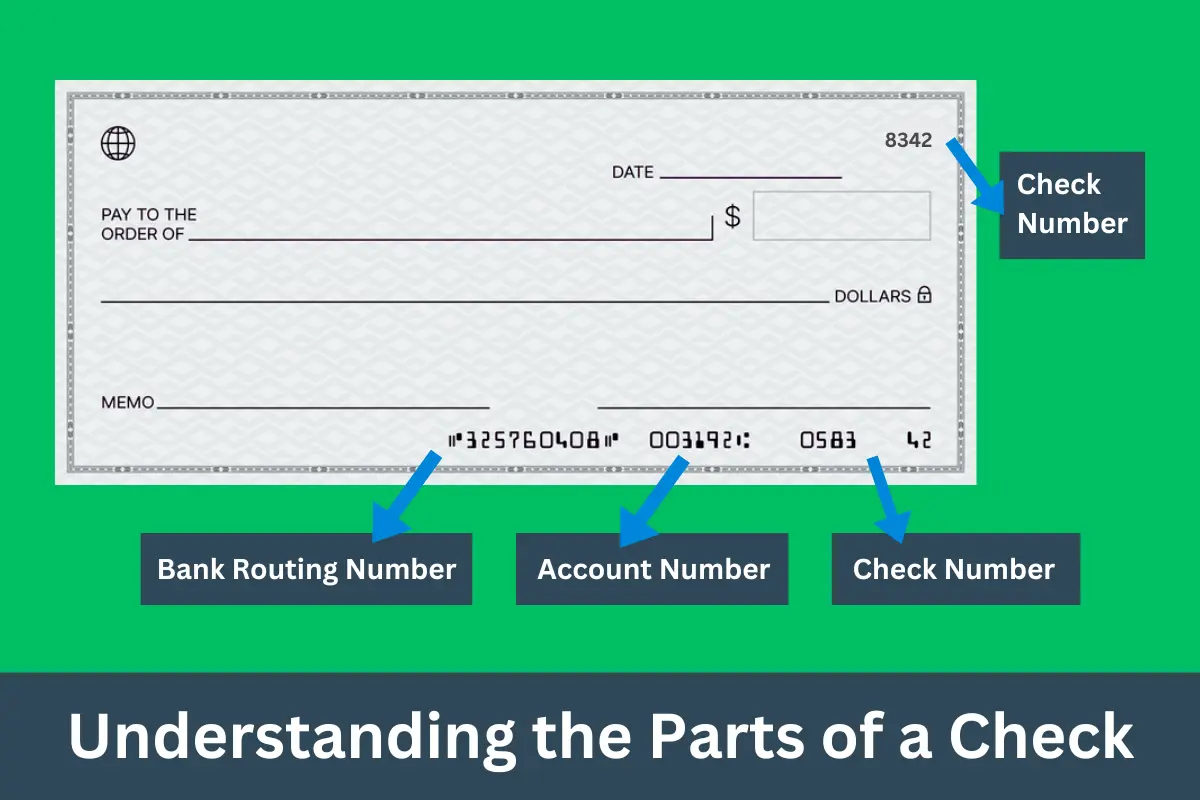
Before we dive into writing a check, let's first understand the different parts of a check:
- Check number (also known as the check sequence number)
- Payee (the person or organization being paid)
- Date (the date the check was written)
- Pay to the order of (the name of the payee)
- Amount (the amount of money being paid)
- Memo (optional field for additional information)
- Signature (the initials and signature of the account holder)
- Bank routing number and account number (located at the bottom of the check)
Step-by-Step Guide to Writing a Check with a Check Number

Step 1: Date
Start by writing the date on the top right corner of the check. Ensure the date is in the format of month, day, and year (e.g., March 13, 2026).
Step 2: Payee
Write the name of the payee in the "Pay to the order of" section. Make sure to spell the name correctly.
Step 3: Amount
Write the amount of money being paid in the "Dollars" and "Cents" section. Ensure the amount in the dollar box is identical to the amount written on the legal line.
Step 4: Memo
Include an optional memo field to provide additional information about the payment. This can be useful for reminder notes or details about the transaction.
Locate the check number in the top right corner of the check. This number should be unique and sequential.
Step 6: Bank Routing Number and Account Number
Locate the bank routing number and account number at the bottom left corner of the check. These numbers should match the account information.
Step 7: Signature
Sign the check with your signature and initials. Ensure the signature matches the one on file with the bank.
Tips and Reminders
:max_bytes(150000):strip_icc()/how-to-write-cents-on-a-check-315355-final-5be57b294a9044788686c3f54cc35d2d.jpg)
Before writing a check, remember the following:
- Always account for sufficient funds in your checking account to cover the check amount.
- Write the date in the correct format to avoid confusion.
- Include the correct payee name and amount to avoid errors.
- Use a pencil to fill in the check number to avoid smudging.
- Keep a record of the check number and transaction for future reference.
Conclusion
Writing a check with a check number is a straightforward process that requires attention to detail and understanding of the different parts of a check. By following the steps outlined in this guide, you'll be able to write checks confidently and securely, ensuring you make prompt payments every time.
Additional Resources
For further guidance and practice, we recommend checking out our tutorial on How to Write a Check or using online resources such as Mint's Check Writing Lesson or Check Writing Exercises for a comprehensive understanding of check writing.


")


